Our Process
For us, producing lumber is less of a straightforward process and more of an art form. Years of experience go into ensuring that lumber makes it through our facility as smoothly as possible and with the highest-yielding lumber for our customers.
Taking a tree standing in the forest and making it into a board is not as simple of a process as it might seem. Depending on a sawmill’s location, the specie being cut, and the thickness of lumber, it might take as few as 3 months to become a finished product to as long as 2 years! For us here at Linden Lumber, most lumber is ready to be sold within a year of being brought into our facility… which is still a long time to make a finished product.
For us, producing lumber is less of a straightforward process and more of an art form. Years of experience go into ensuring that lumber makes it through our facility as smoothly as possible and with the highest-yielding lumber for our customers. We’d like to share with you how lumber is made at Linden, a little bit about what drives us as we’re Redefining Southern Lumber.
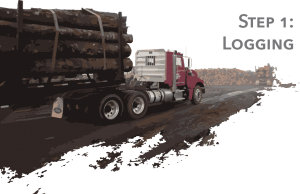
Step 1: LoggingLogs are brought into our main facility from the woods, where a core group of logging crews supplies us with the raw material we need to run our sawmill. Logs are brought in by truck (like the one you see here), and unloaded with a boom lift. Then, logs are grouped by length and diameter to separate them for the best yielding application. Smaller logs will become cross ties, while larger diameter logs will become sawn lumber, which we’ll focus on more below. |
 … |
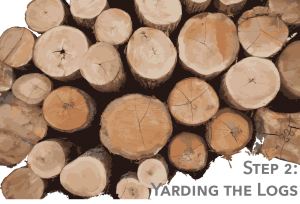 … |
Step 2: Yarding the LogsOnce a log reaches our facility, we’ll wait to accumulate enough similar material to run in our sawmill. We’ll run red oak by itself, white oak the same way, and when we can get to white ash logs, we’ll cut it by itself. Which raises an interesting point: not all types of logs can be harvested year-round. Some species, like ash, naturally grow in low areas near rivers, which are impossible to access during our wet winters. Now, back to yarding: while logs are waiting to be cut on the yard, they’ll be kept “under water.” Keeping logs wet and cool while they’re waiting prevents splitting, rotting and discoloration of the wood before it’s cut. It’s similar to the old-fashioned way, which was to literally sink logs waiting to be cut in a pond or river. Now, we use a more efficient sprinkler system, with self-contained runoff—a cycle where we re-use all of the water used to keep the logs cool and wet, all year round. |
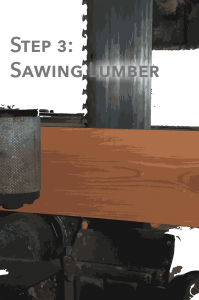
Step 3: Sawing LumberOnce we have accumulated a “run” of logs for the sawmill, we’re ready to make some lumber! Logs will enter the sawmill through a door surrounded by laser-eyes. These eyes scan the logs for metal and other hidden materials in the log that would damage our equipment, and also communicates with our saw equipment to give us the most efficient way to cut a log into boards. There’s a lot more science behind how the sawmill works, but one interesting fact is that the thickness we cut in the sawmill is quite a bit thicker than the finished product. “Green lumber”—that is lumber that hasn’t been dried—naturally has a lot of moisture in it. In the drying process, the lumber shrinks, and finding that exact measurement to cut in the sawmill is quite a science. Typically, lumber will shrink about 12-15% from when it’s green to when it’s a finished product! |
 … |
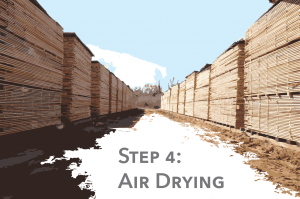 … |
Step 4: Air DryingAfter leaving the sawmill, lumber is stacked on sticks and placed on a yard, where it will dry for 2-9 months, depending on the specie and the weather. White Oak takes longer to dry than red oak, for instance, and thicker lumber takes longer to dry than thinner lumber. While the lumber is drying, we’ll periodically check the lumber to make sure it’s drying on schedule—not to fast that we cause splitting & other defects in the lumber, but fast enough that we don’t cause the lumber to rot and discolor. At the end of the air drying process, our lumber will be 25-30% moisture content, which means that 25-30% of a board’s weight is actually comprised of water. This point is called fiber saturation, which is the point at which a board has released the most moisture that it will naturally. To get the rest of the way, we have to kiln-dry the material. |
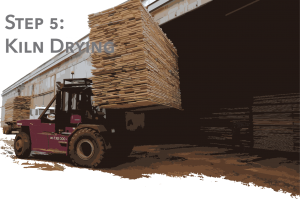
Step 5: Kiln DryingOur kiln-dried lumber leaves our yard around 6-8% moisture content, so we have to coerce our lumber to give up some 20-30% more moisture to make a finished product. Our lumber is loaded into a kiln by a lift (like you see here), and it begins the process of kiln drying. Kiln drying requires the entire kiln full of lumber to be filled with steam, equalizing the moisture content of the kiln’s “atmosphere” and the interior of the lumber. Then, the moisture content of the kiln is slowly decreased, while the temperature of the kiln is slowly increased. This helps ensure a flat, even, split-free finished product. The high heat (up to 170 degrees) also kills any harmful parasites or insects that could be living in the lumber, which is important for our export customers. |
 … |
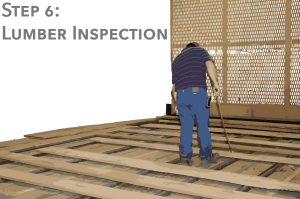 … |
Step 6: Lumber InspectionWe’ve come a long way at this point, but we’re not done yet. Lumber that has completed the kiln-drying process is ready to go across our inspection line, where a team of lumber inspectors will mark the lumber to be separated into specific grades (like the image shows). There are several grades or classifications of lumber, whose rules are strictly monitored by the National Hardwood Lumber Association (NHLA), of which we are a proud member. Our inspectors will check for any sort of defect that may have been caused in our manufacturing process to guarantee that our customers receive a top-notch finished product. After being inspected, our lumber will be bundled together, tallied, and stored in inventory until it’s ready to be sold. |
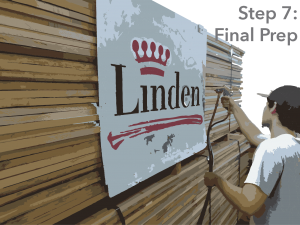
Step 7: Final PreparationOnce our sales team has sold a load of lumber from inventory, we’ll do some final QC to make sure everything is right. We’ll double-check our grade, weights, and lumber tallies, prep the load, and put the final touches on our lumber as it leaves. The very last thing we’ll do is spray our logo on our finished bundles (like you see here), and lumber made in Linden, Alabama is ready to be shipped down the street or across the globe! |
 … |
If you’ve made it this far, you’re quite a trooper! Thanks for reading about our passion, and please keep in touch with us. If you’re a homeowner or industry associate, contact us here to learn more about what we do. If you’re not yet a customer of ours, whether you’re a distributor, factory or hobbyist, contact our sales team and we’ll be happy to work with you to help you grow.

© Copyright 2015 Linden Lumber.
All Rights Reserved.
All Rights Reserved.